Friday, May 30, 2008

Scripting: Learning to Love the Locals

Time for another couple of scripting tidbits today, but covering something that is an important and extremely useful aspect of scripting and blueprints - Local Variables. I see lots of script examples where values are hardcoded into the script. While this is functional, it is something that I try to avoid, because generally, with a little bit of extra effort, such scripts can be turned into gems that can be reused and save hours of production time.

One great example that ships with the game (and most people would be familiar with) is the SpeakTrigger. Simply paint the trigger, edit the variables to set the correct NPC to speak, whether it's a cutscene, whether they talk immediately or if they have to run to you first, whether it's a one shot or able to be used multiple times, and you're done. You don't have to open up the script and save a new copy each time you want a speak trigger.

It's significantly easier to enter in these variables rather than recoding the script everytime - have you delved inside the gtr_speak_node and the call it makes? Recoding that everytime you wanted a different speak trigger would be fraught with danger (you could break the script by typing in the wrong place) not to mention inefficient. Each separate speak trigger would have its own script that the NWN2 engine would have to load up (small processing overhead) and store (small storage overhead). Sure, a few fractions of a second or kilobytes here or there don't seem like much, they add up. But enough harping on about how great local variables are - let's get on to some examples of WHY!

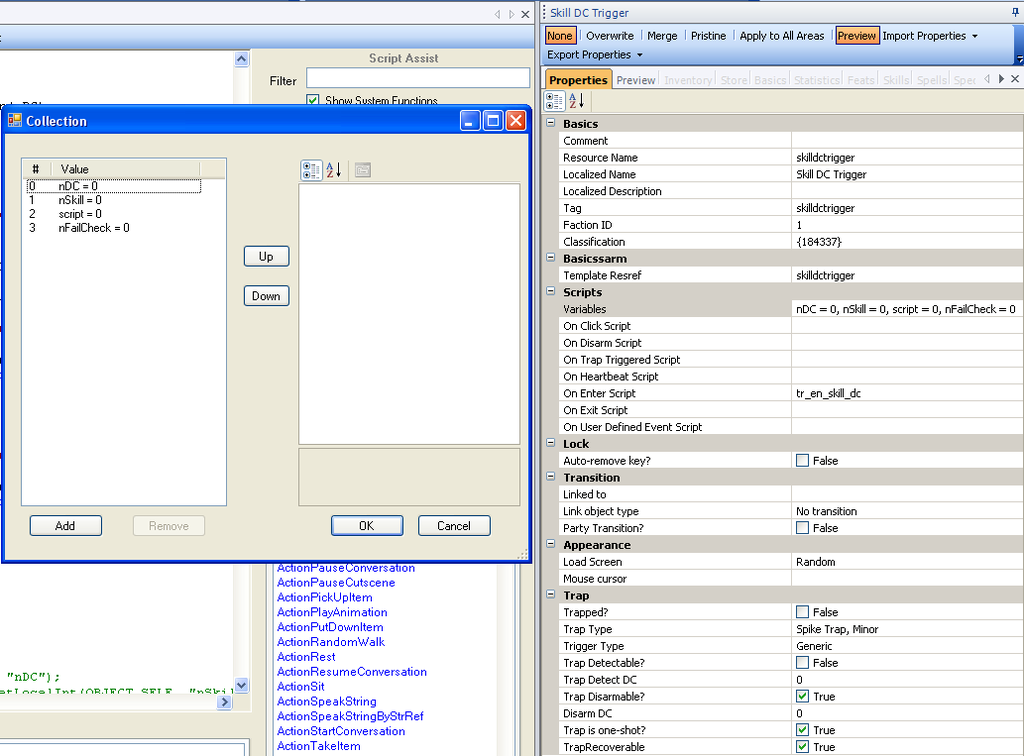
I've got another example that I created for my module that enables the use of skills in an "invisible" fashion. What I wanted was a trigger blueprint that would do a skill DC check on the PC the first time the PC enters the trigger. I want to be able to specify the following things:
* The DC to check against
* The skill that is being test
* A script to run upon "success"
* Whether the script is run when I succeed the check, or when I fail the check

So my blueprint looks like this:


Now, while I'm espousing the qualities of local variable to cut down on scripting, you'll notice that I've I'm running another script when the test "succeeds". So you might argue I'm not saving much in terms of scripting, but the bonus is that I don't have to duplicate my skill dc check code everytime I want a new skill dc trigger.

Basically, I yanked the code from the gc_skill_dc script and modified for use on a trigger. The code looks like so:

// tr_en_skill_dc
/*
NOTE: You *MUST* use a unique tag for every object that uses this script.
Will do a skill DC test for the PC *ONCE ONLY*
The parameters below should be set as the variables of the object.
If the check succedes, the script will execute the script specified by the "script" variable on the object.

ALTERNATIVELY:
It is possible to set "nFailCheck" to 1, and then the script will execute if the PC FAILS the check

Multiplayer note: It also may be desirable to give the option to only fire once - ie destroy self afterwards.

Parameters:
int nDC = dc check value
int nSkill = skill int to check
string script = script to run upon "success"
int nFailCheck = whether to run the check on passing or failing the check
0 = run the script if the check succeeds (default)
1 = run the script if the check fails

Remarks:
skill ints
0 APPRAISE
1 BLUFF
2 CONCENTRATION
3 CRAFT ALCHEMY
4 CRAFT ARMOR
5 CRAFT WEAPON
6 DIPLOMACY
7 DISABLE DEVICE
8 DISCIPLINE
9 HEAL
10 HIDE
11 INTIMIDATE
12 LISTEN
13 LORE
14 MOVE SILENTLY
15 OPEN LOCK
16 PARRY
17 PERFORM
18 RIDE
19 SEARCH
20 CRAFT TRAP
21 SLEIGHT OF HAND
22 SPELL CRAFT
23 SPOT
24 SURVIVAL
25 TAUNT
26 TUMBLE
27 USE MAGIC DEVICE
*/
// BMA-OEI 9/02/05
//AmstradHero - 16/05/08 : Modified to deal with multiple PCs and companions

#include "ginc_param_const"

void main()
{
object oPC = GetEnteringObject();
if(!GetIsPC(oPC))
return;

int nDC = GetLocalInt(OBJECT_SELF, "nDC");
int nSkillVal = GetSkillConstant(GetLocalInt(OBJECT_SELF, "nSkill"));

object oOwner;
if (GetIsOwnedByPlayer(oPC))
{
oOwner = GetControlledCharacter(oPC);
}
else
{
oOwner = oPC;
}

int nDoOnce = GetLocalInt(oOwner, "DO_ONCE" + ObjectToString(OBJECT_SELF)); // a unique do-once
if(nDoOnce == 1)
return;
SetLocalInt(oOwner, "DO_ONCE" + ObjectToString(OBJECT_SELF), 1);
SetLocalObject(OBJECT_SELF, "oActivator", oOwner);

if (GetIsSkillSuccessful(oPC, nSkillVal, nDC) == TRUE)
{
if (GetLocalInt(OBJECT_SELF, "nFailCheck") != 1)
{
string script = GetLocalString(OBJECT_SELF, "script");
ExecuteScript(script, OBJECT_SELF);
}
}
else
{
if (GetLocalInt(OBJECT_SELF, "nFailCheck") == 1)
{
string script = GetLocalString(OBJECT_SELF, "script");
ExecuteScript(script, OBJECT_SELF);
}
}
}
I've included all the comments from the original script with a few additions - that way I can easily open up the script to remind me which value corresponds to which skill. Also, please note the point at the top where it says every trigger must have a unique tag - if you don't, then running over one tag will result in another tag not reacting the first time you run over it.

Two interesting things from this script. Firstly, it only operates on a party leader, and only takes their skill into consideration. That's what the oOwner logic is doing - making sure that any companion is ignored for the purposes of the skill check. It wouldn't be too hard to add in another local variable that would allow you to take advantage of companion skills as well, and then add the appropriate logic in for that. (If anyone is particularly interested in this script, I could code up and post a modified version that would allow just that.)

The second is that you'll also note that I've got a SetLocalObject call that stores the PC (oOwner) as an object on the trigger. This is to allow future access of the PC (if required) for any script that is activated by this trigger.

With those things in mind, using this trigger is practically complete. All you need to do is paint the trigger, fill in the relevant variables and then code up the secondary script. I've found it a useful way to code up little encounters and skill checks.

If you want something a little more specific, then I made a modified version of the above that performs a "tracking" test on the PC, and can get the PC to comment based on whether they have succeed the check or not.

// tr_en_track
/*
Description:

Modified version of tr_en_skill_rank.
Checks search and Survival to determine success and displays floating text on success.

NOTE: You *MUST* use a unique tag for every object that uses this script.
Will do a skill rank test for the PC *ONCE ONLY*
The parameters below should be set as the variables of the object.
If the check succedes, the script will execute the script specified by the "script" variable on the object.

Multiplayer note: It also may be desirable to give the option to only fire once - ie destroy self afterwards.

Parameters:
int nRank = minimum rank to return TRUE
string sText = text to display as floating yellow text if check is successful
string sFail = text to display (if any) upon failure
int xpReward = amount of XP to give to the player as a reward for succeeding the check

Checks Search and Survival to determine success

*/
//AmstradHero - 16/05/08 : Modified to cope with multiple PCs and companions

#include "ginc_param_const"

void main()
{
object oPC = GetEnteringObject();
if(!GetIsPC(oPC))
return;

int nRank = GetLocalInt(OBJECT_SELF, "nRank");

object oOwner;
if (GetIsOwnedByPlayer(oPC))
{
oOwner = GetControlledCharacter(oPC);
}
else
{
oOwner = oPC;
}

int nDoOnce = GetLocalInt(oOwner, "DO_ONCE" + ObjectToString(OBJECT_SELF)); // a unique do-once
if(nDoOnce == 1)
return;
SetLocalInt(oOwner, "DO_ONCE" + ObjectToString(OBJECT_SELF), 1);

if ( (GetSkillRank(19, oOwner) >= nRank) || (GetSkillRank(24, oOwner) >= nRank) )
{
string sText = GetLocalString(OBJECT_SELF, "sText");
AssignCommand(oOwner, SpeakString(sText));
GiveXPToCreature(oPC, GetLocalInt(OBJECT_SELF, "xpReward"));
}
else
{
string sText = GetLocalString(OBJECT_SELF, "sFail");
if (sText != "")
{
AssignCommand(oOwner, SpeakString(sText));
}
}
}
All you need to do is create a new trigger blueprint, add in the relevant variables to the blueprint (I'd suggest adding a default XP reward value on the blueprint), then attach the script. These are fairly simple scripting examples, but they're useful tools for providing some extra skill checks into a module. Players like their skills and choices to have an effect, so make life easier for yourself by using little scripts like these to make using them a simple affair!

Tuesday, May 27, 2008

Status Update 27-May: Lipflappers and Crafting

Things have been moderately productive since the last update, but I don't have many more fancy screenshots to show for it. I've been working on fixing up some of the conversations through the module, as well as adding in quite a few more. Unfortunately, posting screenshots of these would most likely give away some fairly significant plot points... but rest assured that I'll post more as I'm going along.

One of the major causes of extra work has been my discovery of Rogue Dao Studio's lipflappers. While I had heard of it previously, I'd never known where to find it or what it did or how much effort was required to implement it. For those who know, feel free to skip the rest of this paragraph, for those who don't, it provides lip movement for character during conversations. All you need is to copy it to your working module directory (you ARE building in directory mode, right??!?) and then you simply use the name of the "sound" files (minus the .wav) under the node tab on each speaker's node in a conversation. All you need to do is adjust the number to equal the length of seconds the speaker talks for. With those easy steps, your woes about characters with non-moving lips disappear! It's a Godsend and it makes cutscene style conversations look much better. I can't recommend it highly enough.

The rather inconclusive poll results regarding crafting made me decide not to implement my own custom crafting system within 'Fate Of A City'. However, I was pleasantly surprised to find that implementation of the OC's crafting system is as simple as adding in the necessary ingredients, workbenches and tools. As such, the OC style crafting will be available to those that wish to use it. While in a low-powered adventure you may feel like picking a crafting skill is underpowered, but I'll try and add in a few extra bits and pieces that give an added incentive to those that chose to spend their precious points on those skills.

For some quick statistics: the module is currently sitting at 31 areas, 54500 words, 83 scripts, and 92 conversations. And there's still plenty more to come.

Sunday, May 18, 2008

Status Update 18-May: Screenshot Bonanza

Yes, I know, there aren't any screenshots visible in this post. But rather than posting the occasional screenshot here in the blog, I've been saving up some over a few days to post them in one big group. This way, I can include a link to a screenshot gallery so that people can view them all eighteen of them in one place. Also, if you've got an opinion on me posting one or two screenshots here occasionally or saving them up for a post like this, I'd like to hear it!

If you flick through those screenshots, you'll notice a new party member by the name Veolus Wend. Veolus is a rather poor tempered individual that very rarely receives a favourable reception from others, but he does not endear himself to others. Veolus is a hard man with very little time for others, for his prime concern is himself.

I also hope that the dialog screenshots give you a good indication of the quality of the dialog you can expect (and I hope you like what you see!). Not only are options and outcomes dependent on your abilities and skills, but expect to be able to choose from a variety of different answers. Your answers will have consequences, whether it is the immediate consequence of an alignment change, an NPC reacting less favourably, or even more far-reaching than that...

Also, I'm interested to know whether people are interested in having crafting implemented in the module. I'm still debating this decision myself, though I'm leaning towards trying to implement the OC/MotB system so as to provide players with a familiar experience and to limit the amount of additional effort required - adding in a whole new crafting system isn't exactly a small undertaking. So please, vote away on my latest poll and comment freely!

NB. Yes, I know I wrote "particular" instead of "particularly" in the middle poll option. I've made a mental note to pay more attention when I'm creating polls, as it's not possible to change them after the first vote! :-(

Sunday, May 11, 2008

Design: Area Texturing and Colouring

Today I'd like to discuss my approach to texturing and colouring of landscapes. I developed this technique while working on my Highlands area for the Obsidian Exterior Area Competition, but I've since refined it. Specifically I'm going to focus on mountains and hills, but the techniques can be applied more or less to most landscapes. I'm going to be explaining it with a step-by-step illustration using the northern edge of the slums area for 'Fate Of A City'.

I like a blended look, so I very rarely try to lay down a 100% texture on top of my base. Firstly, this helps provide a more constant look throughout the area, and secondly, the blending gives the texture a little added depth. There are some circumstances where you will want to use a 100% brush - for example, if one of the finer dirt textures is your base texture and you are making a cliff, the dirt texture looks a little strange as an underlay on the rock. I suppose for a more general rule, if there is a disparity between the size in terms of individual visible elements of the texture, it is more likely that you will want to use a 100% brush.

For this area, I have Dirt_05 as my main texture, and I've laid down some small swabs of Grass_23 and Rocky_03 over the landscape to start with, as they are my primary textures for this area. You can see the starting point in the screenshot below. Note that all the development screenshots have been taken from within the toolset and you can click on the screenshots for a larger image.


Use a fine brush for this initial step - I like to use the small brush or perhaps up to a 1-4 (1 inner, 4 outer) brush. Map out all the areas which you want to be strongly textured and lay this down. You may only dab a dot or two in some spots, but that's fine for now. The aim for this step is to lay down your promiment cliff faces with your cliff texture. I used Cliff_02 and 75% opcacity for this first step below.


Next, drop the opacity of that texture by 15-30%. (I originally used 15%, but I've found that larger percentages work just as well, if not better). Consider using 25%-30% if you used a 100% brush to start with. Use a brush in the range 1-3 to 1-5, and trace around the edge of all the edges you just painted. You'll also want to extend it at points, for where you still want that texture applied, but at lesser intensity. For example, if the cliff is not as sheer, extend it further than the edges of your higher brush. For my screenshot below, I used 50% opacity.


Then, we do the same again. Drop the opacity another 15%-30% (again, depending on your initial starting opacity) and you should be at most around the 40% mark, and using a brush in the 1-4 to 1-7 range. Again, trace the edges of your previous texturing, and extend a bit further where necessary. This is typically a reasonable level to end your texture blending. Note that the toolset results never look the same as the in game results (at least as far as I'm concerned they don't), so you may want another SMALL blend at around the 20% mark - though often it's not necessary because now it's time to colour. Typically the toolset blending appears less smooth than in the game itself. Additionally, the colouring we'll do later on means that any sharp differences will be less noticeable. The screenshot below is the final use of Cliff_02, this time at 25% opacity.


The next step is to lay down what I call the "buffer" texture. This is generally something that provides a contrast from your base texture, and is used to separate the cliff texture and the grass texture. You want to use an opacity in the range 30%-50%, and a brush since around 1-3 to 1-6. I must admint, I generally use 1-4 as my "workhorse" brush. Here, I've used Rocky_03, and a 35% opacity.


The final texture step is to use your grass texture, putting it down in most of the flatter areas that haven't yet been touched by another texture. Of course, you won't want to apply it everywhere, unless you're going for the appearance of grassy hills. Having an occasional slope with a generous helping of grass is nice as well, just as something to break up the landscape and make it a little more interesting. For my screenshot below, I've used Grass_23 at 40% opacity.


I can't emphasise how important colouring is. It brings an ordinary landscape to life. The first thing to do is to drop the opacity right down. Generally I find I don't want any more than 20% for normal work, and typically stick at about 10%. 1-4 is my staple brush as it provides a smoothed effect that avoids deep texture colour on a single vertex at smaller brush sizes. I find anything smaller can very easily make sharp edges that look very unappealing.

I'll only cover two colouring steps here, because although you can use further colouring afterwards to add more depth if you want, these two steps are sufficient for a nice effect. The first is the blending of the "buffer" texture. Basically the trick is to pick a dark, semi-satured brown (something that is almost in-between the last two series of browns in the colour picker) and paint around the edges of your buffer texture. The trick is to do it erratically, going in and out of the edge into the grass or the rock. It is also nice to apply it to some of the grass or rock areas as well, notice the cliff in the centre of the image that I've coloured heavily to get a dirty looking rock face.


The second colouring step is to weather it using a colourless tint. I find that using 100% black has less desirable results than using something around an 80% grey. This steps is a bit more haphazard and artistic. It's a matter of colouring some things that are exposed, as well as some of the deeper gullies, and random patches about the landscape. There's no real hard and fast rule for this final step, except for making sure that you don't have large patches with even application of colouring.


Of course, it would be remiss of me to have done all this work without actually showing you what it looks like in-game...


While it's only visible as the background, (and the foreground is by no means anywhere near completed) it gives an impressive vista to peer at from the edges of the map.


I hope this has been interesting to see my approach to area texturing, and that you've picked up a few tips and tricks that you find useful!

Thursday, May 8, 2008

Scripting: The Little Things

This is just a placeholder post with a quick apology regarding my May 4 post on NPC managing conversations. There was a potential problem in the script as I originally posted it, in that it was possible for the trigger to be incorrectly destroyed! It is now fixed, so please grab it again if you copied it before. My sincere apologies for not noticing earlier!

Today I have three small utility scripts that are handy in various situations. The first two are OnEnter scripts for triggers that you can use to fire off a single line of speech. The first is to get an NPC to speak a line when the PC steps on the trigger. Of course, you could use a speak trigger to do this, but this way there's no need to create a conversation file with a single line, and the trigger destroys itself upon having been fired.

// tr_en_npc1liner
/*
Description:
Makes a specified npc/object speak a line ONCE for each that PC passes over the trigger

Local Trigger Variables:
talkString - the string the chosen NPC should say
npcTag - the exact tag of the NPC to speak the line
*/
//AmstradHero - 01/04/08
void main()
{
object oPC = GetEnteringObject();
if(!GetIsPC(oPC))
return;
//The following has to be done in two lines, otherwise the string is not retrieved properly
string talk = GetLocalString(OBJECT_SELF, "talkString");
AssignCommand(GetObjectByTag(GetLocalString(OBJECT_SELF, "npcTag")), SpeakString(talk));
DestroyObject(OBJECT_SELF);
}

The second is very similar, except displays floating text above the PC instead of having an NPC speak the line. This is handy for where you want to have the PC "hear" or "notice" something as opposed to having an NPC say something.

// tr_en_pc1liner
/*
Description:
Makes each PC that passes over the trigger say the specified line once

Local Trigger Variables:
talkString - the string the chosen NPC should say
*/
//AmstradHero - 01/04/08
void main()
{
object oPC = GetEnteringObject();
if(!GetIsPC(oPC))
return;

FloatingTextStringOnCreature(GetLocalString(OBJECT_SELF, "talkString"), oPC);
DestroyObject(OBJECT_SELF);
}

The last script is designed for use in conversations. It allows you to change the first name, last name, or both names of an object with a specific tag. I feel this is a nice touch that allows you to add names dynamically to NPCs, rather than just having the PC magically know the names of everyone they meet automatically.

// ga_set_object_name
/*
Changes the first and last names of object oTag to the two supplied strings
If no object tag is specified, the change will be applied to OBJECT_SELF

AmstradHero - 08/04/08
*/
void main(string oTag, string sFirstName, string sLastName)
{
object oTarg;
if (oTag == "")
{
oTarg = OBJECT_SELF;
}
else
{
oTarg = GetObjectByTag(oTag);
}

if (sFirstName != "")
{
SetFirstName( oTarg, sFirstName);
}
if (sLastName != "")
{
SetLastName( oTarg, sLastName);
}
}

While these scripts may not look like much, they're just small enhancements to a modding toolkit that helps to improve productivity and to add that special extra touch.

Monday, May 5, 2008

Status Update 5-May: Custom Item Descriptions

Today's update marks a milestone in the development of 'Fate of a City', namely that the total word count (courtesy of the PowerBar plugin) is 50,000 words! While this may be an arbitrary milestone, it's still nice to have reached. Of course, there's still much more to come, for I've still got a substantial number of conversations left to write... in addition to the rest of the work that still remains. I've started working on adding more depth to the party companions, focussing on the specific conversations you can hold with them as opposed to the interjections that I've been including along the way so far. I've also added a few more areas to the city, and a few merchants that are there to cater for specific item needs.

In other exciting news, I did an audition for Melirinda for a mod she's working on to voice Saemon Havarian - a swashbuckling pirate that you may remember if you played Baldur's Gate 2: Shadows Of Amn. I was lucky enough to have Melirinda pick me to do the voice acting for this fun character, and I'm looking forward to recording the many lines she's already sent me... and more to come! You should check out Melirinda's previous submissions to the nwvault, they're all of a very high quality.

Now, for a little more of a spoiler about some of the custom items that I've been working on, I'd like to post the descriptions of a couple of items that you'll be able to find within the city of Darthall. I won't divulge the actual statistics of the items, but I'm sure you can make some guesses based on their descriptions...

-----
Glittering Gloves

Designed for use by novice adventurers, the creation of gloves like these is popular for a first enchanting task. The gloves allow the wearer to cast the spell "Color Spray" without exhausting the mage's own repertoire of spells, which is a great boon for neophyte mages. While the gaudy colour of these gloves may be off-putting, their utility for beginning spellcasters is undeniable.
-----
Brute's Rapier

While rapiers are normally the domain of fine swordsmen or warriors touting finesse over brute strength, this particular weapon is designed for force rather than deft handling. This weapon was created by a former pit warrior turned smith by the name of Kullus, who appreciated the art that could be infused within a weapon like a rapier yet preferred a direct and aggressive fight.

Kullus created this weapon so that its wielder would be able to wield a finely crafted weapon and yet still attack with the same ferocity as someone wielding a larger blade. Unfortunately for Kullus, he never saw the blade in action, for he was killed by its intended buyer.

The balance of the weapon is slightly off, as though it were created for someone with a slightly different shaped hand, and the extra weight it has as a rapier makes it a little unwieldy. This means it lacks the defensive capability that is often a hallmark of rapiers, but more than compensates for this through the additional power it can inflict through its blows, as it seems to batter its foes into submission.
-----

Lastly, I'd love to hear feedback on yesterday's post about triggers and scripting. It may not be a paragon of scripting, but I still find it a useful tool to have in my repertoire, but more importantly, I'm really keen to hear whether people are interested in knowing more little blueprints, scripts or tricks that I use while modding.

Sunday, May 4, 2008

Toolset Tidbit: Managing Multiple Meetings with NPCs

I've recently decided that I'm going to change the blog style a little from mere progress updates and teasers to offering little fragments of design and tips and tricks that I find help me and improve my work while I'm doing modding. Rest assured that I won't fail to post updates on how the mod is progressing (and you can expect one tomorrow!), but I thought I'd like to offer a bit more information to fellow builders in terms of things that I find useful. If there's enough enthusiasm, I might even end up collating all my useful scripts and blueprints into a prefab module for people to download. On this note, I'll discuss a set of scripts/triggers that I've found useful to have. I'll first describe the scenario, and then the solution.

Scenario
The player has a conversation with an NPC, at the end of which, the NPC leaves the area in which they are talking. The NPC leaves the area and moves to another area in the module, where the player will meet them later. The main issue here is the relevance of the NPC's dialogue - as the NPC's dialogue is different upon meeting them initially, and then changes once they meet the player for the second time.

Possible Solutions
The first option is create a separate blueprint for the NPC. Create a conversation that has the initial conversation as a "show once" starting node, then a sequence of barkstrings as they are leaving, in case the player catches up with them as they are walking/running away. These nodes also need a ga_move script attached so that the NPC keeps moving to its exit destination. Upon the ending node of the initial conversation, have a ga_create_object script call that creates a new instance of this blueprint at the desired location that PC will meet the NPC later, and assign it a new conversation.

The second option is to jump the NPC to a destination location, and use a local variable to keep track of its state. This is particularly handy if you're trying to maintain the state of the NPC in question. What do I mean by this? Imagine your NPC has an item that the PC can pickpocket off him/her. Your blueprint is likely going to have this object as part of its inventory. If the PC pickpockets the NPC the first they meet them, the item is gone, but when you recreate the NPC at the new location using ga_create_object, it will magically have another one of said item. If you jump the NPC, it maintains its state. There are other examples as well, but I think I've illustrated the point.

So, basically, we need a similar sort of dialogue set up, with a ga_move call at the end of the initial conversation and a sequence of barkstrings. However, we need a few extra things. Firstly, we need to create a trigger that will jump the NPC to a new destination when it gets to the exit. So place a trigger around the destination waypoint, and then use the following script for the onEnter action of the trigger.

//tr_en_jump_npc
/*
Description:
Jumps an object (typically an NPC) with a specified tag to a specific waypoint/object when it hits the trigger.

Local Trigger Variables:
sJumper - tag (or a substring in the tag) of the object to jump to the selected waypoint
sJumpDest - tag of the waypoint/object to jump the object to
bMultiUse - If this is set to 0, the trigger will be destroyed after the first use
Set this variable to 1 if you want the trigger to operate on multiple objects with the same tag

AmstradHero - 22/04/08
*/
void main()
{
object oPC = GetEnteringObject();
//Get the string first to avoid any weirdness
string sJump = GetLocalString( OBJECT_SELF, "sJumper");

//Use FindSubString because the StringCompare compare was giving inconsistent results
//Substring also allows us to jump multiple NPCs while also allowing for previous/later granularity in command assignment
if ( FindSubString( sJump, GetTag(oPC) ) != -1 )
{
//Grab the object because we've got the right one
object dest = GetObjectByTag( GetLocalString( OBJECT_SELF, "sJumpDest"));

//Jump it there
AssignCommand( oPC, ClearAllActions());
AssignCommand( oPC, JumpToObject( dest ));
//Now set its rotation to match the waypoint
DelayCommand(4.0f, AssignCommand( oPC, SetFacing( 180.0-GetFacing( dest ) ) ) );

//Destroy the trigger if it's not designed for multiple uses
if (GetLocalInt(OBJECT_SELF, "bMultiUse") == 0)
{
DestroyObject(OBJECT_SELF, 0.5f);
}
}
}

So all you need do is create the relevant variables on the trigger. So for argument's sake, let's say we have a NPC with the tag c_thief, who moves to a waypoint wp_thief_escapes, which when he leaves the current area will jump to a destination wp_thief_hideout in another area within the module. So we have the wp_thief_escapes waypoint inside this trigger, which has the variable sJumper = "c_thief" and sJumpDest = "wp_thief_hideout". Note that you could potentially set nUseMult to 1 if you wanted, but in many cases we don't need it.

So now we are good to go, right? Unfortunately no, because we need to set the NPC to talk differently upon reaching its destination. So switch to the destination area, and create another trigger around the jump destination waypoint that the NPC moves to. So we create a trigger aorund our waypoint wp_thief_hideout. and use the following script for it onEnter.

//tr_en_set_npc_int
/*
Description:
Sets an integer variable on an object (typically an NPC) with a specified tag to a specific value upon entering

Local Trigger Variables:
sNPC - tag (or a substring in the tag) of the object to jump to the selected waypoint
sVarName - name of the variable to set
nValue - value to set the variable to
bMultiUse - If this is set to 0, the trigger will be destroyed after the first use
Set this variable to 1 if you want the trigger to operate on multiple objects with the same tag

AmstradHero - 22/04/08
*/
void main()
{
object oPC = GetEnteringObject();
//Get the string first to avoid any weirdness
string sNPC = GetLocalString( OBJECT_SELF, "sNPC");

//Use FindSubString because the StringCompare compare was giving inconsistent results
//Substring also allows us to jump multiple NPCs while also allowing for previous/later granularity in command assignment
if ( FindSubString( sNPC, GetTag(oPC) ) != -1 )
{
//Grab the object because we've got the right one
SetLocalInt(oPC, GetLocalString(OBJECT_SELF, "sVarName"), GetLocalInt(OBJECT_SELF, "nValue"));

//Destroy the trigger if it's not designed for multiple uses
if (GetLocalInt(OBJECT_SELF, "bMultiUse") == 0)
{
DestroyObject(OBJECT_SELF, 0.5f);
}
}
}

Again, create the relevant variables on the trigger. Where sNPC = "c_thief" and we're going to use sVarName = "talkState" and nVarValue = "1". Now comes the final step of creating our next dialog chain above our old one, with the initial condition of gc_local_int - with the parameters "talkState" and "1". And voila! We now have an NPC that we can move around.

Even better, we can simply repeat the steps in order (increasing the value talkState again) to have the NPC move yet again if desired... As an example, perhaps you are pursuing an enemy through a maze. At different stages during the chase, you have a small exchange, then can deal a small amount of damage to the enemy before they leave. Of course, you want to keep track of any items/abilities the NPC has used and any damage they have taken along the way - and these two triggers/scripts allow you to do that as well as creating a series of taunting conversations at each stage. You could also use either trigger in isolation for various purposes too.

While I've used the second option in some cases where it's not necessary in my module, I like the approach because I've got that consistency option there if I want to use it, and also, I get to keep a single conversation for the same NPC, rather than the first option which means having multiple different conversations used for the "same" NPC (at least it the same one as far as the player is concerned, even though might know better).

I hope that someone finds this a useful tidbit that they might be able to use. Any feedback on it or whether you like the idea of more posts like this would be appreciated!